


Snow Roses Sculpture Painting Tutorial | Step-by-Step for Beginners. ❄️????
Welcome to my art channel!
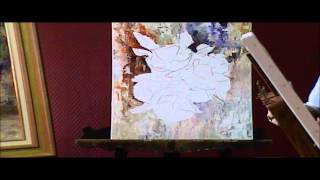
In this video, I share a Snow Roses Sculpture Painting tutorial specially created for beginners. I explain everything step by step, starting from the base preparation, material selection, and basic techniques, all the way to shaping and finishing the snow roses.
This tutorial is perfect if you are:
❄️ New to sculpture painting
❄️ Learning how to prepare the base correctly
❄️ Looking for an easy and detailed floral sculpture painting
❄️ Interested in relaxing and creative art projects
I focus on clear explanations and simple techniques so anyone can follow along and create beautiful results at home.
✨ Don’t forget to like, comment, and subscribe for more beginner-friendly sculpture painting tutorials!
#SculpturePainting
#SnowRoses
#BeginnerArt
#3DFlowerPainting
#TextureArt
#ArtTutorial
#SculpturePaintingForBeginners
#FloralArt
#EasyArtTutorial
Here's a breakdown of the process:
• Materials Needed (0:13): The tutorial begins by listing the necessary materials, which include a palette knife, white cement or putty, water, glue, tissue papers, thread, and white acrylic paint.
• Base Preparation (0:41):
• The base mixture is prepared by combining white cement, water, glue, and white acrylic paint. A palette knife is used for mixing.
• Individual strings of thread are added to the mixture to act as a binder (1:18).
• Torn pieces of tissue paper are then mixed in (1:39). Water can be added if the consistency is too thick (1:54).
• The prepared base mixture is spread evenly over the canvas, including the sides for continuity (2:08).
• The base is left to dry for 24 hours (3:10).
• Applying the First Coat of Color (3:47):
• A separate mixture for the flowers and patterns is prepared using the same base ingredients (3:23).
• Pink, orange, and blue acrylic paints are mixed for the first coat (3:53).
• A wet sponge is used to apply these colors to the canvas, aiming for a foggy rather than bright look (4:17). White paint can be added if the colors appear too bright (4:54).
• Working on the Flowers (5:39):
• Peach color is mixed with the previously prepared texture mixture for the flowers (5:40).
• The mixture's consistency can be adjusted with extra cement if it's too loose (5:52).
• Refining the Background and Drawing the Design (7:48):
• White acrylic paint is tapped onto the canvas with a sponge to achieve a foggier finish if the background is too bright (7:48).
• A cone, made from the backside of stickers or henna cone material, is used to draw the design on the canvas (7:12, 8:22).
• Final Touches (9:56): After the canvas dries, it can be washed to remove any excess dust or dirt. The video concludes with the artist's belief that "every imperfection is a perfection in art" (9:10).
Welcome to my art channel!
In this video, I share a Snow Roses Sculpture Painting tutorial specially created for beginners. I explain everything step by step, starting from the base preparation, material selection, and basic techniques, all the way to shaping and finishing the snow roses.
This tutorial is perfect if you are:
❄️ New to sculpture painting
❄️ Learning how to prepare the base correctly
❄️ Looking for an easy and detailed floral sculpture painting
❄️ Interested in relaxing and creative art projects
I focus on clear explanations and simple techniques so anyone can follow along and create beautiful results at home.
✨ Don’t forget to like, comment, and subscribe for more beginner-friendly sculpture painting tutorials!
#SculpturePainting
#SnowRoses
#BeginnerArt
#3DFlowerPainting
#TextureArt
#ArtTutorial
#SculpturePaintingForBeginners
#FloralArt
#EasyArtTutorial
Here's a breakdown of the process:
• Materials Needed (0:13): The tutorial begins by listing the necessary materials, which include a palette knife, white cement or putty, water, glue, tissue papers, thread, and white acrylic paint.
• Base Preparation (0:41):
• The base mixture is prepared by combining white cement, water, glue, and white acrylic paint. A palette knife is used for mixing.
• Individual strings of thread are added to the mixture to act as a binder (1:18).
• Torn pieces of tissue paper are then mixed in (1:39). Water can be added if the consistency is too thick (1:54).
• The prepared base mixture is spread evenly over the canvas, including the sides for continuity (2:08).
• The base is left to dry for 24 hours (3:10).
• Applying the First Coat of Color (3:47):
• A separate mixture for the flowers and patterns is prepared using the same base ingredients (3:23).
• Pink, orange, and blue acrylic paints are mixed for the first coat (3:53).
• A wet sponge is used to apply these colors to the canvas, aiming for a foggy rather than bright look (4:17). White paint can be added if the colors appear too bright (4:54).
• Working on the Flowers (5:39):
• Peach color is mixed with the previously prepared texture mixture for the flowers (5:40).
• The mixture's consistency can be adjusted with extra cement if it's too loose (5:52).
• Refining the Background and Drawing the Design (7:48):
• White acrylic paint is tapped onto the canvas with a sponge to achieve a foggier finish if the background is too bright (7:48).
• A cone, made from the backside of stickers or henna cone material, is used to draw the design on the canvas (7:12, 8:22).
• Final Touches (9:56): After the canvas dries, it can be washed to remove any excess dust or dirt. The video concludes with the artist's belief that "every imperfection is a perfection in art" (9:10).
- Catégories
- Tutoriels Sculptures
Ajouter un commentaire
Up Next
Autoplay
-
00:53

Snow White Themed Baby Photoshoot | Baby Snow White Setup | Disney Princesses | Snow White
-
15:31
Let It Snow, Let It Snow, Let It Snow! Guitar Tutorial - Guitar Lessons with Stuart!
-
09:33
Sculpture Painting Tutorial for Beginners|Sculpture painting Flowers Tutorial|Sculpture Painting
-
00:17
Snow Snow Snow Sahur Finally Revealed in Festive Event ❄️???? | Brainrot Evolution Roblox!
-
02:42
Frank Sinatra - Let It Snow! Let It Snow! Let It Snow! - Piano Tutorial
-
05:01

Bryan.G - Les Couleurs De L'amour
-
06:07

Cours De Guitare - Gipsy Kings : Bamboleo (2/8) Rythmique
-
04:45
Démonstration De Fleurs Réalisées à La Peinture à L'huile Et Au Couteau, Par Catherine VICTOIRE
-
01:14

Générique TARATATA (Musique Composée Par Jean-Jacques Goldman)
-
04:12

Run Away With Me by Section C

Commentaires